Most creators treat upload on YouTube like admin work. Export the file, drag it in, fill a few boxes, click publish, move on.
That mindset works when you're posting casually. It breaks when you're trying to build a channel, revive an archive, or turn a pile of long-form content into a real business asset.
The upload is where a video gets its identity. It gets named, categorized, packaged, connected to the rest of your library, and positioned for discovery. If you handle that step well, one video can become a durable asset that keeps feeding views, leads, subscribers, and ideas for future repurposing. If you handle it poorly, even strong content can disappear into the platform.
Beyond the Upload Button A Strategic Mindset
The common pattern is familiar. You finish editing late, export the file, rush through the upload form, and tell yourself you'll clean up the details later.
Later usually never comes.
That approach is risky because YouTube is crowded at a scale that's hard to grasp. Over 500 hours of video are uploaded every minute, or about 720,000 hours each day, according to YouTube upload volume data. In that environment, upload on YouTube isn't the end of production. It's the first moment of distribution strategy.
Think like a publisher, not a poster
Publishers don't ask only, "Did the file go live?"
They ask:
- What is this asset about: Can someone understand the topic from the title, description, thumbnail, and category?
- Where does it fit: Is it part of a series, a playlist, a recurring content bucket, or a broader audience journey?
- What can it become later: Can this video be clipped, embedded, transcribed, updated, translated, or repackaged?
That shift matters when you're moving from hobbyist creator to operator. One upload can feed Shorts ideas, newsletter segments, podcast clips, blog embeds, and future follow-up videos. But only if the asset is organized from day one.
Every upload creates either order or debt
A rushed upload creates content debt. Titles become inconsistent. Descriptions stay thin. Tags and categories get guessed. Playlists don't get updated. Files end up scattered across drives with no naming system.
A disciplined upload creates compounding value.
Practical rule: If you can't find, classify, and reuse a video six months later, you didn't just upload it. You misplaced it.
This is also why cleanup matters. If older videos no longer match your standards, your brand, or your legal comfort level, reviewing them is part of library management. For executives and teams dealing with harmful or unwanted appearances, this YouTube content removal guide gives a useful overview of response options.
Treat the upload as a repeatable operating system
A professional creator benefits from a standard checklist:
- Name the file clearly before upload
- Use a consistent metadata structure
- Connect the video to a playlist or series
- Add viewer pathways to related content
- Store the final source assets in an organized library
If you're still building the basics, this guide on starting a successful YouTube channel is a good companion to the upload workflow itself.
The big shift is simple. Stop thinking, "I need to get this video posted." Start thinking, "I'm adding a new asset to my catalog."
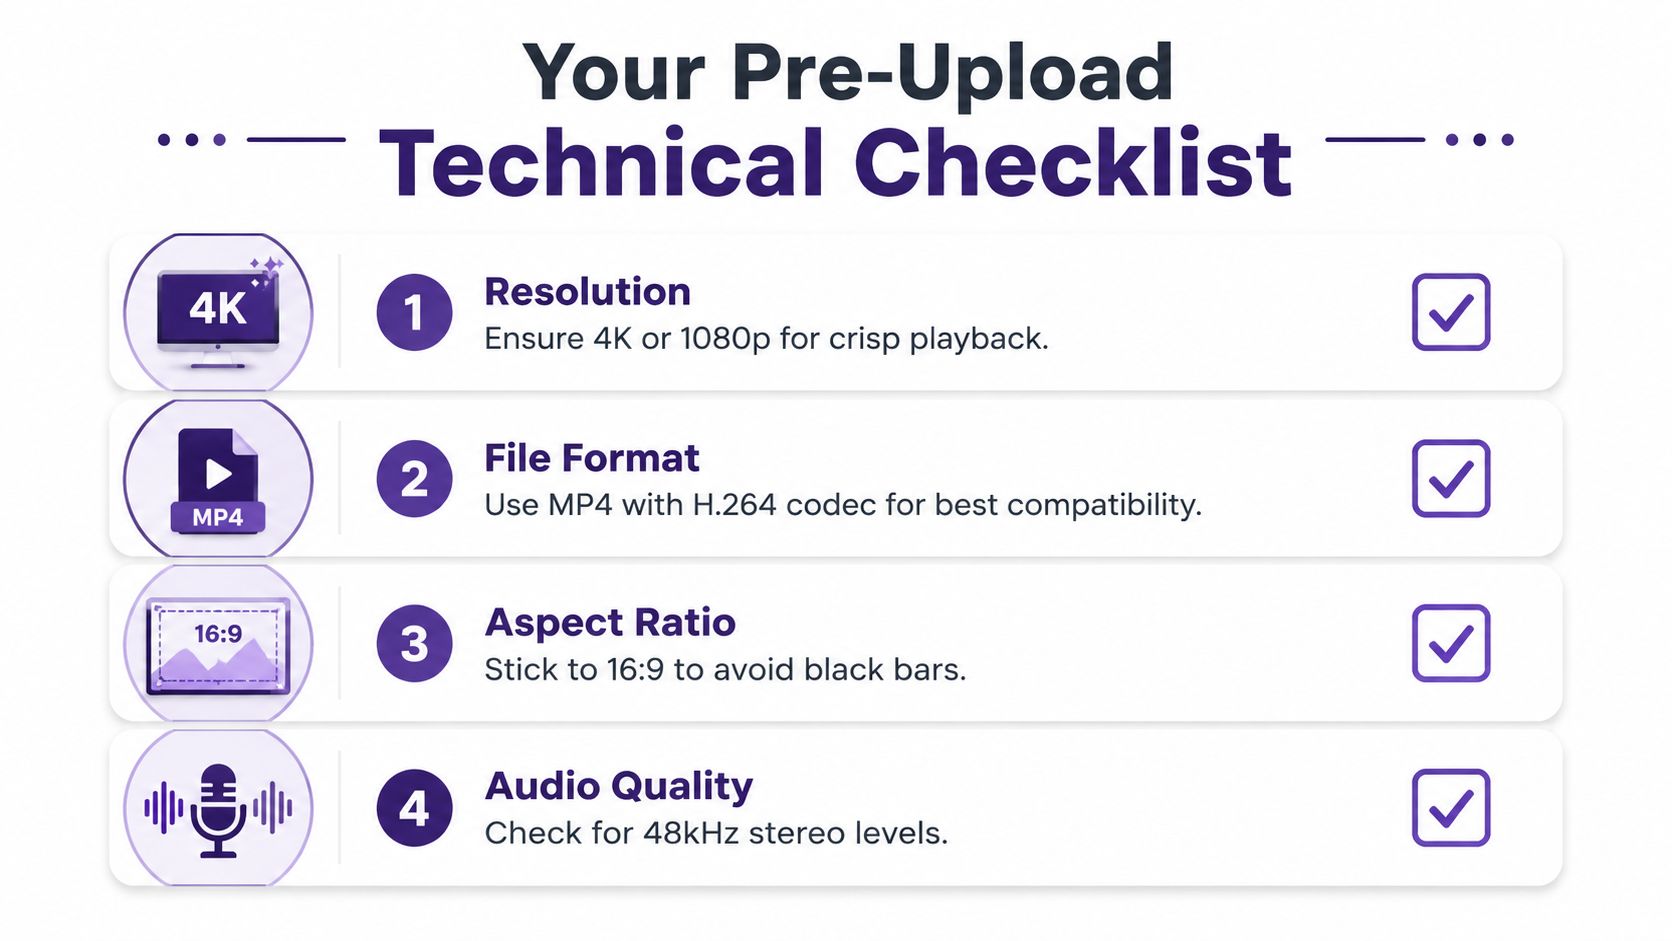
Your Pre-Upload Technical Checklist
A video can look finished on your timeline and still be a poor upload candidate. I see this constantly with otherwise strong content. The edit is solid, but the export introduces softness, audio problems, black bars, or a file so heavy that processing drags.
That creates more than a technical annoyance. It creates library friction. A bad export is harder to trust, harder to reuse, and more likely to become the version that keeps causing problems later.
The settings that matter most
Use stable, standard export settings that YouTube handles reliably. The goal is a file that publishes cleanly now and stays usable later if you need to clip it, repackage it, dub it, or add it to a series archive.
A practical pre-upload check looks like this:
- Container format: Export to MP4 when possible. It works well across editors, storage systems, and upload workflows.
- Video codec: H.264 is a safe default for broad compatibility.
- Audio codec: AAC keeps audio handling predictable on upload.
- Aspect ratio: Use 16:9 for standard horizontal videos. Keep vertical only when the format is intentional.
- Resolution: Export at the resolution you edited for, often 1080p or 4K for long-form content.
- Audio quality: Make sure speech is clear, consistent, and easy to understand before you export.
None of this is glamorous. It saves time.
What usually goes wrong
Upload issues usually start with one of a few preventable mistakes. If you know the pattern, you can fix the source instead of troubleshooting inside YouTube Studio.
| Problem | Usually caused by | Better move |
|---|---|---|
| Video looks soft | Low-resolution export or aggressive compression | Re-export from the master timeline with a cleaner preset |
| Black bars appear | Sequence size does not match final aspect ratio | Match timeline settings to the intended delivery format |
| Audio sounds thin or distorted | Bad leveling or incorrect export settings | Check the final mix and monitor with headphones before export |
| Upload takes forever | File size is larger than needed | Use a cleaner H.264 preset with sensible bitrate settings |
The trade-off is simple. Over-compress and the video looks weak. Export too heavy and you slow down uploads, backups, transfers, and review cycles. A good preset sits in the middle. Clean image, clear audio, manageable file size.
Build a repeatable export template
Recurring formats should use recurring presets. If you publish interviews, tutorials, commentary, podcasts, or course modules, save export templates in Premiere Pro, Final Cut Pro, DaVinci Resolve, or whatever editor your team uses.
That gives you consistency across the library. It also makes handoffs easier if an editor changes, a VA handles uploads, or you revisit old content months later. The file specs are already standardized.
One more habit catches expensive mistakes. Watch the exported file before you upload it. At minimum, check the opening, a middle section, and the ending for frozen frames, missing graphics, sync drift, and audio dropouts.
A reliable upload starts with a reliable master file. If the export is clean, the rest of the publishing workflow gets faster and your content library stays easier to manage.
Navigating the Upload Process on Desktop and Mobile
YouTube gives you two main ways to upload. Desktop is the full control room. Mobile is the fast lane.
Both work. They just serve different situations.
Desktop is where strategy lives
If the video matters, use desktop.
YouTube Studio on desktop gives you the complete workflow: file upload, title, description, thumbnail, playlists, audience settings, checks, video elements, and visibility. Significantly, it lets you think clearly because you can see the whole publishing environment at once.
The flow usually feels like this:
Select the file
The upload begins processing immediately. While that happens, you start packaging the asset.
Fill in Details
Key elements provide the video's context. Title, description, thumbnail, playlist placement, and audience selection all help YouTube understand what the video is and where it belongs.
- Review Video elements
You connect the video to your wider library through end screens, cards, and other viewer paths.
Check Visibility
Private, unlisted, scheduled, or public isn't just a publishing preference. It's a release strategy.
Desktop is also better when you're uploading evergreen content from a back catalog. Older assets usually need more thoughtful metadata, playlist placement, and internal linking than same-day reaction content.
Mobile is built for speed
The mobile app is useful when timing matters more than polish. If you're posting a quick update, a vlog segment, or on-the-go footage, mobile can get the job done.
The trade-off is simple:
- Use desktop when: metadata quality, thumbnails, library organization, and release timing matter
- Use mobile when: speed and convenience matter more than full optimization
That doesn't mean mobile is careless. It means you should know what you're sacrificing. On a phone, you're less likely to write a strong description, compare title options, or connect the upload neatly to the rest of your archive.
A quick visual walkthrough can help if you haven't used the interface in a while:
What each stage is really doing
A lot of creators click through the upload flow without understanding why each stage exists.
Each screen in the uploader asks a different question. What is this video, who is it for, how should viewers move from it, and when should it go live?
That's the mental map to keep.
The Details stage defines the asset. Video elements shape session flow. Checks reduce avoidable issues. Visibility controls launch conditions. Once you see the process that way, upload on YouTube stops feeling like paperwork and starts feeling like packaging.
Optimizing Your Upload for Maximum Discovery
Metadata does more work than most creators think. It tells YouTube what the video is about, gives viewers a reason to click, and makes your library more searchable later.
A weak upload often isn't weak because the content failed. It fails because the packaging was vague.
Titles need clarity before cleverness
A title has two jobs. It needs to make sense in search and earn attention in browse.
That usually means leading with the main topic, not a cryptic phrase you understand because you made the video. If the video teaches podcast editing for beginners, say that. If it breaks down a documentary workflow, name the workflow.
A good title tends to include:
- The topic first: Put the main subject near the front
- A specific outcome: Show what the viewer gets
- Natural phrasing: Write for humans, not keyword stuffing
For a broader framework on packaging discoverable videos, this roundup of YouTube SEO best practices is worth reviewing alongside your own channel data.
Descriptions should help both search and humans
Most descriptions are underused. Creators either paste nothing useful or dump a wall of text nobody reads.
Use the first lines to explain the video's value clearly. After that, add supporting context such as topic variations, resources, timestamps, linked episodes, and related series references. Descriptions also help future-you when you're reviewing your archive and trying to understand what a video covered.
A practical structure looks like this:
| Description section | What belongs there |
|---|---|
| Opening lines | Clear summary of the video's promise |
| Middle section | Supporting context, linked resources, topic language |
| Lower section | Series references, credits, recurring channel info |
Stop guessing the category
One of the most overlooked parts of upload on YouTube is the category field. Many creators pick one quickly and never think about it again.
That's a mistake.
A useful strategy is to study what top-performing competitors are already using. Reverse-engineering their metadata with viewer tools can reveal how successful videos in your niche are being classified. That matters because category choice helps frame how YouTube understands the content for discovery. This point is highlighted in a creator-focused discussion of competitor category analysis and metadata viewing.
Don't choose a category based on what sounds right to you. Choose it based on how successful videos like yours are actually being classified.
A simple workflow helps:
- List a handful of channels that serve the same audience
- Find videos that match your format and topic
- Inspect their metadata with a YouTube metadata viewer
- Look for recurring category patterns
- Apply that insight consistently across related uploads
This is especially useful for creators repurposing podcasts, webinars, interviews, and educational archives. The content often sits between formats, which makes guessing even more dangerous. Smart categorization gives that content a better shot at landing in the right recommendation environment.
Enhancing Viewer Experience Before You Publish
A video can be technically uploaded and still feel unfinished.
The final layer is what viewers experience once they land. Professional channels distinguish themselves from casual posting at this point. Thumbnails, captions, chapters, and end screens don't just make the video look better. They make the rest of your library easier to discover.
Thumbnails and chapters shape the first impression
The thumbnail is the package front. It needs to communicate topic, tone, and promise at a glance. If the title says one thing and the thumbnail suggests something else, viewers hesitate.
A useful thumbnail test is simple: can someone understand the video's subject in a small size, on a phone, without audio? If not, simplify it.
Chapters matter for a different reason. They help viewers move through long-form content without feeling trapped in it. That's especially useful for interviews, lectures, tutorials, and podcast-style uploads. If you want a cleaner workflow for this, here's a practical guide on how to add timestamp to a YouTube link.
End screens and cards should move people through the library
A single video view has limited value. A session across multiple related videos has much more.
Use end screens to route viewers into the next logical asset. Not just any asset. The next one. If someone watches part one of a tutorial series, send them to part two. If they watch a founder interview, send them to a case breakdown or related conversation.
Cards can help during the video, but don't overload them. Too many prompts feel needy and distract from the content.
A clean approach is:
- One clear next step: Choose the most relevant follow-up video
- Playlist alignment: Route viewers into a curated series when possible
- Library logic: Connect uploads by topic, format, or audience maturity
Use captions and timing strategically
Captions improve accessibility and make spoken content easier to follow. They also help when viewers watch with sound off or in mixed environments. For creators with dense educational content, captions can make the difference between a useful archive and a frustrating one.
There's also a release tactic many creators ignore. Uploading as unlisted or private for 24 to 48 hours before going public creates a holding pattern that gives YouTube time to process and categorize the content before live performance signals kick in, as discussed in this video on unlisted and private pre-launch timing.
If the video matters, don't rush it live the second the upload finishes processing.
That window is useful for practical reasons too. You can review captions, fix a description, test the thumbnail, check chapters, and confirm end screens before public traffic hits the page.
Upload on YouTube transforms into release management at this stage, rather than just file delivery.
Scaling Up Programmatic Uploads for Content Libraries
A team decides to migrate 300 webinars, podcast episodes, and training recordings onto YouTube. The first 10 uploads feel manageable. By week two, the problem is clear. Files are scattered, titles follow three different naming conventions, thumbnails are inconsistent, and nobody agrees on which videos should go live first.
That is the point where uploading stops being a publishing task and becomes asset management.

The bottleneck shows up fast
Programmatic uploads through the YouTube Data API help teams automate repetitive work, but automation does not remove limits. As noted earlier, API upload quotas force trade-offs. Large libraries cannot be pushed live all at once, so teams need a release order, metadata standards, and rules for which assets get processed first.
That changes the operating model fast.
A good upload pipeline answers four questions before anything is sent to YouTube:
- Which assets have the highest business value?
- Which metadata fields need to stay consistent across the catalog?
- Which videos belong in series, playlists, or learning paths?
- Which uploads deserve manual review before release?
Without those decisions, programmatic uploading creates scale, but not order.
What scaled teams do differently
Teams handling archives of interviews, webinars, lessons, or podcast footage usually move from one-off publishing to repeatable systems.
| Manual creator workflow | Library-scale workflow |
|---|---|
| Upload one video at a time | Batch assets by series, format, rights status, or priority |
| Write metadata per upload | Apply structured metadata templates and naming rules |
| Choose videos ad hoc | Rank assets by revenue potential, audience demand, or strategic use |
| Store files wherever convenient | Keep assets in a searchable system with clear ownership |
The difference matters because YouTube rewards consistency at the channel level, and internal teams need consistency to operate at all. If a title format changes every week, playlist logic breaks down. If descriptions are written from scratch every time, affiliate links, disclaimers, and calls to action drift. If source files live across shared drives and personal folders, republishing turns into detective work.
That is why mature teams build around a proper video content management system for organizing searchable content libraries. The goal is not software for its own sake. The goal is knowing what you own, what each asset is for, and how fast your team can turn dormant footage into useful inventory.
The real lesson
At scale, upload on YouTube becomes part of content operations. The upload itself is just the handoff point.
The valuable work happens before and around it. Teams review rights, standardize metadata, map videos to playlists, decide what should be updated versus republished, and protect API capacity for the assets that matter most. That is how a back catalog starts producing search traffic, watch time, leads, and downstream revenue instead of sitting idle in storage.
If you're sitting on a library of videos, podcasts, webinars, or articles that still have unrealized value, Contesimal is worth a look. It helps teams organize content libraries, classify assets, surface reusable material, and turn historical content into structured workflows for research, repurposing, and distribution.